
.jpg)
 8 months ago
90
8 months ago
90
PROTECT YOUR DNA WITH QUANTUM TECHNOLOGY
Orgo-Life the new way to the future Advertising by AdpathwayAuthor by Amanda Davis on October 28, 2025 Updated on October 28, 2025
These fall napkin luminaries are easy to make and look so beautiful in your window, on your mantle, or atop your Thanksgiving table!
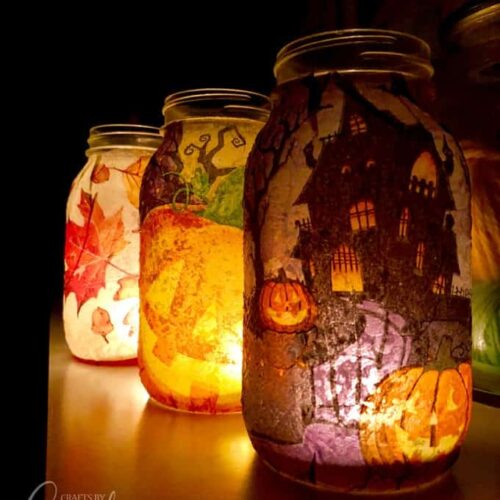
I’m all about luminaries and have made many different kinds over the years. These fall napkin luminaries make use of pretty fall and Halloween paper napkins that you can find at dollar stores, big box stores, and even the grocery store.

How to Make Fall Napkin Luminaries
If you’re looking for an easy project for girls’ night, need something seniors can make, or just want to add something to your home decor this fall, these Halloween and fall napkin luminaries are a great choice!

Mod Podge Tips
Before you get started, and especially if you didn’t watch the detailed video where I give tips, please be sure to read through these first:
- Don’t use white glue and water – while this solution does work, it can yellow over time. Mod Podge (and other decoupage mediums) is formulated to prevent yellowing. See our post on How To Choose The Best Glue for Your Craft Projects for more tips!
- Do “prime” your jar first by applying a thin layer of Mod Podge. This will make the glass tacky and will make it easier to apply the napkin.
- Separate double-ply napkins if you have them. The ones I used in this tutorial were sturdy one-ply napkins.
- Apply Mod Podge gently and with a light touch over the napkin to avoid ripping it. Remember, decoupage medium is a liquid and napkins are delicate. Using a heavy hand can cause damage to your pretty design!
- When applying the Mod Podge, use a generous amount but not so much that dripping occurs.
- Be sure to allow your finished project to dry completely (overnight is best) before adding a candle and displaying.
- Always store your Mod Podge with a tight-fitting lid and in a cool place out of reach of children.
- Placing your wet decoupage projects onto a wire cooling rack keeps them from sticking to your table!

How to make Halloween and fall napkin luminaries
Simply scroll to the end of this post for the full printable tutorial and supply list.
- Wash and dry your glass jar.
- Prepare your paper napkins by separating ply (if needed) and cutting out designs.
- Apply a thin coat of Mod Podge to the front of your jar.
- Lay jar on its side with the wet side facing up.
- Place napkin onto the jar, pressing gently from the center outward.
- Apply Mod Podge to the bottom, side edges and rim.
- Using a gentle hand, apply a coat of Mod Podge over the top of the entire napkin.
- Repeat steps on the back side of the jar.
- Allow everything to dry completely (overnight is best) before displaying and adding a candle.
- You can decorate the rim with burlap, ribbon or twine, but this step is completely optional.
Be sure to watch the video in this post for help with this project!

More Fall Craft Ideas
We have plenty of fall and Halloween craft projects on this blog, but here are some we handpicked for you!
- Fall Mason Jars
- Burlap Pumpkin Wreath
- Wood Slice Pumpkin Chalkboard
- Mason Jar Lid Pumpkins
- Decomesh Pumpkin Wreath
- Pumpkin Grapevine Wreath
- Stacked Plastic Pumpkins
And be sure to check out this large collection of homemade Halloween decorating ideas!

I love to create and share my projects with you! I know it’s hard to remember to come back and search, so I’ve made it easy for you with my weekly newsletter! You can subscribe for free and I’ll send you fun crafts and delicious recipes every week right to your email.
Fall Napkin Luminaries
These fall napkin luminaries are easy to make and look so beautiful in your window, on your mantle, or atop your Thanksgiving table!
Age Group: Adult Crafts
Project Type: Fall
Author: Amanda Formaro
Supplies
- Paper napkins
- Mod Podge
- Glass jar
Craft tools
Large paintbrush
Instructions
Wash and dry your glass jar.
Prepare your paper napkins by separating ply (if needed) and cutting out designs.
Apply a thin coat of Mod Podge to the front of your jar.
Lay jar on its side with the wet side facing up.
Place napkin onto the jar, pressing gently from the center outward.
Apply Mod Podge to the bottom, side edges and rim.
Using a gentle hand, apply a coat of Mod Podge over the top of the entire napkin.
Repeat steps on the back side of the jar.
Allow everything to dry completely (overnight is best) before displaying and adding a candle.
You can decorate the rim with burlap, ribbon or twine, but this step is completely optional.
Expert Tips & FAQs
- Don’t use white glue and water – while this solution does work, it can yellow over time. Mod Podge (and other decoupage mediums) is formulated to prevent yellowing. See our post on How To Choose The Best Glue for Your Craft Projects for more tips!
- Do “prime” your jar first by applying a thin layer of Mod Podge. This will make the glass tacky and will make it easier to apply the napkin.
- Separate double ply napkins if you have them. The ones I used in this tutorial were sturdy one-ply napkins.
- Apply Mod Podge gently and with a light touch over the napkin to avoid ripping it. Remember, decoupage medium is a liquid and napkins are delicate. Using a heavy hand can cause damage to your pretty design!
- When applying the Mod Podge, use a generous amount but not so much that dripping occurs.
- Be sure to allow your finished project to dry completely (overnight is best) before adding a candle and displaying.
- Always store your Mod Podge with a tight-fitting lid and in a cool place out of reach of children.
- Placing your wet decoupage projects onto a wire cooling rack keeps them from sticking to your table!
This post originally appeared here on Oct 2, 2018.
Amanda Davis is the crafty, entrepreneurial mother of four children. She loves to bake, cook, make kid's crafts and create decorative items for her home. She is a crafting expert and guru in the kitchen and has appeared online and in print publications many times over the years.
Latest posts by Amanda Davis (see all)
Reader Interactions
Free CraftsBy email every week
Latest crafts straight to your inbox!


 English (US) ·